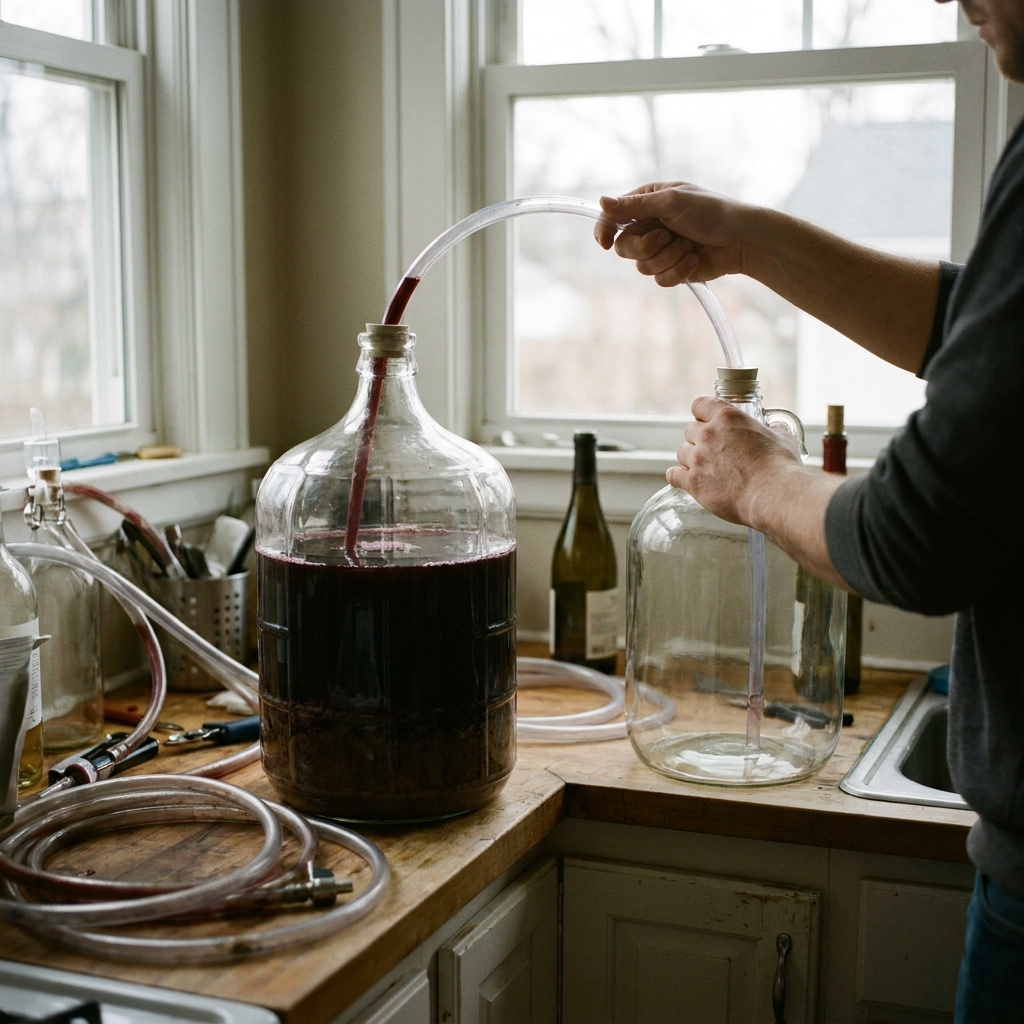
Racking wine means siphoning the cleared wine off the layer of dead yeast and grape solids (the lees) that settles to the bottom of your fermentation vessel, then transferring it into a clean, sanitized carboy or barrel. You’ll rack a typical batch 3-4 times over the course of fermentation and aging. The first rack comes around a specific gravity of 1.010, the second 2-4 weeks after the wine goes dry, and subsequent racks roughly every 3-4 months (or whenever sediment builds to about 1/4 inch / 6 mm) during aging until the wine is clear and barely dropping any new sediment.
Racking is one of those steps that seems fussy until you skip it and taste the difference. Here is the why, the when, and the how.
Why Rack Wine at All? (It’s About the Lees)
Lees are the inevitable byproduct of fermentation: dead yeast cells, grape pulp, tartrate crystals, and other solids that sink to the bottom of your vessel once they’ve done their job. A thin layer of fine lees is harmless – some winemakers intentionally leave wine on fine lees for weeks to add complexity (a technique called sur lie aging). The problem is gross lees: the chunky, thick sludge that accumulates during active fermentation.
Left too long on gross lees, wine can develop off-flavors through a process called autolysis – essentially, the dead yeast cells break down and release unpleasant compounds. You might notice rubbery, meaty, or “yeasty” notes in a wine that spent too long in contact with heavy sediment. In severe cases, hydrogen sulfide (H2S) can build up, giving the wine a rotten-egg smell.
Racking solves this by physically removing the wine from the sediment. It also clarifies the wine naturally, without filtering or fining agents – which is exactly what a home winemaker wants.
When to Rack: The 3 Main Stages
Stage 1: The First Rack (Off the Gross Lees)
Time this one when primary fermentation slows significantly – typically when specific gravity drops to around 1.010 (some winemakers rack a bit earlier, around 1.020, for very aromatic whites). For red wines you’ve fermented on the skins in an open container, this happens at pressing: you press the skins and transfer the new wine into a clean carboy.
At this point a large, gloppy layer of gross lees has formed. This is the one you really don’t want to leave the wine sitting on. Get it off within a day or two of pressing, or as soon as the hydrometer is reading around 1.010 for whites and rosés you’ve been fermenting without skins.
This first rack is also a good time to consolidate your wine into the correct-sized vessel: use a carboy (glass or PET) that the wine fills to within a few inches (5-8 cm) of the top, minimizing headspace.
Stage 2: The Second Rack (After Fermentation Finishes)
About 2-4 weeks after fermentation completes (SG stable at or below 0.995-0.998 for a bone-dry wine), rack again. By now a new layer of fine lees has settled – mostly dead yeast from the final push of fermentation. The wine is still young and cloudy, but this second racking gives it a cleaner foundation to age on.
For cold-climate wines like Marquette or Frontenac picked in mid-October, this second rack typically falls around Thanksgiving. By then the wine has gone dry, and it’s time to move it to a slightly cooler basement corner for the long winter aging phase.
Stage 3: Periodic Racks During Aging
From here, the schedule relaxes. Rack whenever you see a noticeable layer of sediment – roughly 1/4 inch (6 mm) or more – or every 3-4 months during the aging period, whichever comes first. As the wine clears and stabilizes, it will throw less and less sediment, and eventually you might go 4-6 months between racks.
Keep an eye on your hydrometer readings and watch for signs of clarity. A wine that’s been racked several times and shows minimal new sediment is telling you it’s getting close to bottling. You can check clarity by holding the carboy up to a flashlight or bright window: a clear wine with no visible haze is a good sign.
For context on the full timeline from fermentation through bottling, see our wine making step-by-step guide.
How to Rack Wine: Step by Step
The process is straightforward, but details matter – especially once fermentation is over and you’re trying to protect the wine from oxygen.
What You Need
- An auto-siphon (spring-loaded pump siphon) with food-grade tubing – makes starting the flow without mouth-siphoning much easier and more hygienic
- A clean, sanitized receiving carboy (glass or PET) sized to minimize headspace
- Potassium metabisulfite (Campden tablets or powder) for SO2 protection
- A hydrometer (to take a gravity reading while you’re at it)
- A drilled stopper and airlock
Our Pick: Auto-Siphon Racking Kit
A spring-loaded auto-siphon with a long rigid wand is far easier than trying to start a gravity siphon by mouth – and more hygienic. Good ones come with the tubing, tip, and racking cane all in one package.
Browse Racking Kits on AmazonStep-by-Step Process
- Sanitize everything that touches the wine: auto-siphon, tubing, receiving carboy, stopper, airlock. A solution of potassium metabisulfite (2-4 tsp per 1 gallon / 3.8 L of water) works as a no-rinse equipment sanitizer – this is a stronger rinse solution, separate from the smaller dose added to the wine itself.
- Position the vessels. Place the full carboy higher than the empty receiving carboy – on a counter or stool, with the receiving carboy on the floor or a lower surface. Gravity does the work once the siphon starts.
- Insert the siphon wand carefully. Lower it slowly into the full carboy and stop the tip about 1-2 inches (2-5 cm) above the sediment layer. You want to draw from the clear wine above the lees, not stir them up.
- Start the flow with a pump or suction, then guide the output tube to the bottom of the receiving carboy. After fermentation is complete, keep the output tube submerged as the vessel fills – this minimizes splashing and oxygen pickup. During active primary fermentation, splashing is fine since CO2 is present.
- Watch the sediment. As the carboy empties, tilt it gently to keep the siphon drawing from clear wine. Stop before you suck up the sediment layer – a little wine lost to the lees is preferable to contaminating the batch.
- Add SO2 at racking. Once the receiving carboy is full, stir in your potassium metabisulfite dose. A common addition for home winemakers is 1/4 tsp (~1.5 g) of powder per 5-6 gallons (19-23 L), which adds roughly 40-50 ppm total SO2 to the wine; how much ends up as free SO2 depends on the wine’s pH and how much binds to wine components, so aim to maintain about 25-35 ppm free SO2 during aging – more if your pH runs above about 3.5 and use a pH-based sulfite calculator for accuracy. If you’re using Campden tablets, see our Campden tablets dosing guide for amounts by pH.
- Top up headspace. If the receiving carboy isn’t quite full, top it up with a compatible wine or (as a last resort) a small splash of water. Never leave more than 1-2 inches (2-5 cm) of air between the wine surface and the stopper.
- Seal with an airlock filled with a sulfite solution (water plus a pinch of metabisulfite).
For more on SO2 management throughout the winemaking process, see our guide to potassium metabisulfite in winemaking.
Common Racking Mistakes (and How to Avoid Them)
Leaving Too Much Headspace
This is the most common error new winemakers make. After racking, the receiving carboy often isn’t completely full – especially if you lost some wine to the lees or if your batch is slightly smaller than your carboy size. That air gap is an oxidation and spoilage risk. Always top up. Keep a few bottles of neutral wine on hand specifically for topping.
Splashing After Fermentation
During primary fermentation, splashing helps aerate the must and supports yeast health – a little oxygen is beneficial. Once the wine is dry, that changes: oxygen becomes the enemy. Keep the output tube submerged and the flow gentle. If you see excessive bubbling or splashing in the receiving carboy, reposition the tube.
Over-Racking
Each racking adds a small but real amount of oxygen to the wine. That’s manageable with proper SO2 additions, but if you rack every few weeks “just to check,” you’ll accumulate enough oxidative stress to flatten the wine and strip its fruit. Rack when the sediment warrants it – not on a fixed calendar if the wine is still clean from the last transfer.
Skipping the SO2 Addition
Some new winemakers are nervous about adding sulfite. Skipping it at racking means the wine is momentarily without protection at exactly the moment it’s most exposed to oxygen. Unless you’re intentionally making a zero-sulfite wine, add a small dose at each rack. For more on grape tannins and antioxidant compounds that work alongside SO2, see our post on grape skin compounds.
Disturbing the Sediment Layer
Inserting the siphon wand too quickly, or tilting the carboy abruptly, will stir the sediment back into suspension. If that happens, don’t rack – wait 24-48 hours for everything to resettle, then try again. Patience saves you a cloudy batch.
Racking in the Context of Your Full Winemaking Timeline
If you’re just getting started with home winemaking, racking fits into a broader process of fermentation management. Understanding when primary fermentation ends and secondary (malolactic) fermentation begins changes your racking decisions – particularly for red wines where MLF is desirable before you lock in SO2 levels. See our guide on primary vs. secondary fermentation for how these phases connect.
Cold-climate grapes like Marquette and Frontenac tend to ferment vigorously even at cool basement temperatures (55-65°F / 13-18°C) and settle out cleanly. Colder fermentation can actually produce more compact, cleaner lees – one of the unexpected advantages of making wine in a Zone 4 or Zone 5 climate.
Frequently Asked Questions
What is racking wine?
Racking is the process of siphoning wine off the lees (dead yeast cells and grape solids that settle to the bottom of the fermentation vessel) into a clean, sanitized vessel, leaving the sediment behind. It clarifies the wine and prevents off-flavors from prolonged lees contact (autolysis).
When should I rack wine for the first time?
The first racking typically happens when primary fermentation slows and specific gravity drops to around 1.010, or shortly after pressing red wine off the skins. At that point the gross lees have settled and should be removed promptly to avoid autolysis off-flavors.
How often should I rack wine during aging?
A general guideline is every 3-4 months (or whenever sediment builds to about 1/4 inch / 6 mm). As the wine clears over time, you’ll rack less frequently – eventually it will barely throw new sediment, signaling it’s nearing bottling readiness.
Do I need to add sulfite when racking?
Yes. Adding a small dose of potassium metabisulfite at each racking is standard practice. Racking inevitably introduces some oxygen, and the SO2 protects the wine from oxidation and spoilage. A typical addition is 1/4 teaspoon (~1.5 g) of potassium metabisulfite powder per 5-6 gallons (19-23 L), which adds roughly 40-50 ppm total SO2; the resulting free SO2 depends on your wine’s pH and how much binds. Aim to maintain about 25-35 ppm free SO2 during aging and use a pH-based sulfite calculator to dial in your dose.
Should I splash the wine when racking?
During active primary fermentation, a little splashing is fine. Once the wine is dry and you’re racking for clarity or aging, minimize oxygen exposure by keeping the output tube submerged so the wine flows in gently rather than splashing from above.
More winemaking tools on this site: Check out the Brix to Alcohol Calculator, the Grape Variety Finder, and Will My Grapes Ripen? – all free tools built for cold-climate growers.
🍇 Don’t plant the wrong grape
Vines take years to fruit. Get the free cheat-sheet of varieties that actually survive and ripen in your zone.
By subscribing you agree to our Privacy Policy.